

Sweet potatoes, or any type of potato for that matter, are a perfect gardening project for beginners and seasoned gardeners alike. They’re simple to grow and have a high yield and are simply just plain delicious. So how exactly can we grow this delicious vegetable?
You can plant and grow sweet potatoes by burying a potato in soil and allowing some sprouts to grow, removing the sprouts, putting them in a jar of water, and replanting the sprouts, and you only need five pieces of very basic equipment. Sounds simple enough, right? Keep reading this article to find the best tips on how to plant and grow sweet potatoes.
What You’ll Need in Order to Plant and Grow Sweet Potatoes
Are you interested in planting and growing sweet potatoes for yourself? Planting and growing sweet potatoes is a relatively simple process, and you’ll only need a few necessary items in order to grow your own. These items include:
- One or more organic sweet potatoes
- Potting soil
- A plant pot or garden
- Glass jars
- Water
With only these five items, you can plant and grow sweet potatoes of your very own in just five easy steps. Let’s dive into the best step-by-step guide on how to plant and grow sweet potatoes.
Step 1: Wait for Sprouts to Grow From the Sweet Potato
 Unlike many other vegetables, potatoes actually aren’t grown from seeds. Rather, they grow from ‘slips’ (or sprouts) that grow out of the potato itself. You may have noticed that when you let a sweet potato get old, it starts to grow these ‘slips.’ These are what you’ll use to start your initial potato growth.
Let an organic sweet potato sit in a dry, warm environment for a couple of weeks. It’s absolutely important that you use an organic sweet potato because the chemicals that treat regular sweet potatoes can stunt the growth of the slips, making them extremely difficult or even impossible to grow.
By the end of those two weeks, you’ll notice some slips will have formed. Wait until they start looking a little long “leafy” to move to the next step- planting the sweet potato and sprout growths.
Step 2: Plant Your Sprouted Sweet Potato
 This next step is fun. You’ll want to partially bury your sweet potato in a pot with potting soil. Bury it so that the sweet potato is buried, but the sprouts are sticking out. Make sure the pot is big enough that there is ample room for it to grow.
From here on out, you’ll want to water the planted sweet potato every day- just enough that the soil becomes damp. Wait anywhere from three weeks to a month until the sweet potato sprouts have turned green, grown leaves, and grown up to 6 inches tall.
Step 3: Remove the Sweet Potato Sprouts and Place in a Jar of Water
First, prepare a jar full of warm to room-temperature water. Once your sprouts have reached the desired height, remove your planted potatoes with the sprouts from the pot. You’ll then carefully tear the sprouts at the root by twisting them off where they meet the sweet potato.
Place the sprouts into the glass of water. It won’t take long for these sprouts to grow their roots- only two weeks. However, in only a few days you will see the beginnings of white root shoots starting to form from the sprouts.
During this time, make sure you’re keeping your water fresh by replacing it every other day to keep your sprouts healthy and prevent any harmful microorganisms from growing. After the full two weeks has ended and your sprouts have grown roots, it’s time to plant them in soil.
Step 4: Planting Your Sweet Potato Sprouts
Finally, it’s time to plant your sprouts! You can choose to plant them in an individual pot with potting soil or in your garden. In fact, you can even choose to plant them in a pot at first and re-plant them in your garden at any point.
You’ll want to make sure the white roots coming out of the sprouts are fully buried, but you can leave the rest of it out. You can use a pencil to dig out a little space for them, or you can just use your hands to dig a hole and plant them that way, too.
Make sure to water them immediately after planting. From then on out, you’ll want to water them every day for the first week of growth and every other day on from that point. Finally, your prep work is done!
Step 5: Harvesting the Sweet Potato
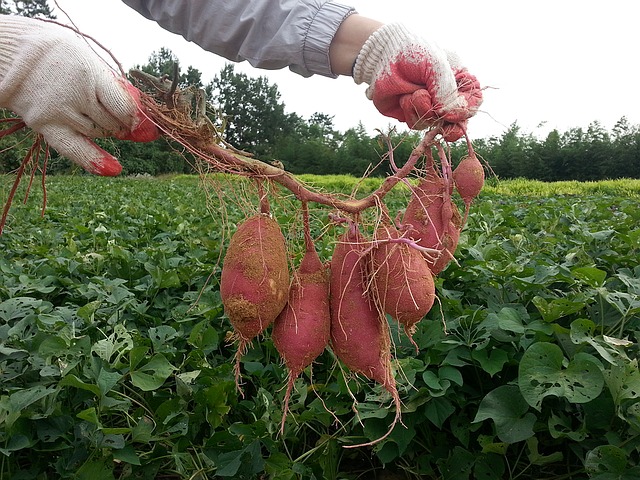 The moment you’ve all been waiting for- sweet potato harvest! Once you notice the ends and leaves of your sprout vines starting to turn yellow, you’ll know the potatoes are ready for harvest. ( Ready to Yield in 3 to 4 months after planting)
Use a gardening fork to gently lift up the soil. Avoid pulling too hard to reduce damage to the roots. Use your hands to feel the sweet potatoes and gently pull them out of the soil. One vine can yield multiple sweet potatoes, so you should have a decent bit of them ready for harvest.
Try using your new sweet potatoes to bake a sweet potato casserole, pie, or simply bake in the oven for a tasty treat. If you’ve got so many you don’t know what to do with them, gift them to some friends!
And there you have it! You know exactly how to plant and grow sweet potatoes. In just a few easy steps, you can grow your own sweet potatoes from the sprouts of an old one by removing them and letting them grow. Enjoy the fruits of your effort by making a delicious treat with them when you’re done. Good luck, and happy gardening!